Why your 3D renders look wrong, and how the camera object fixes it
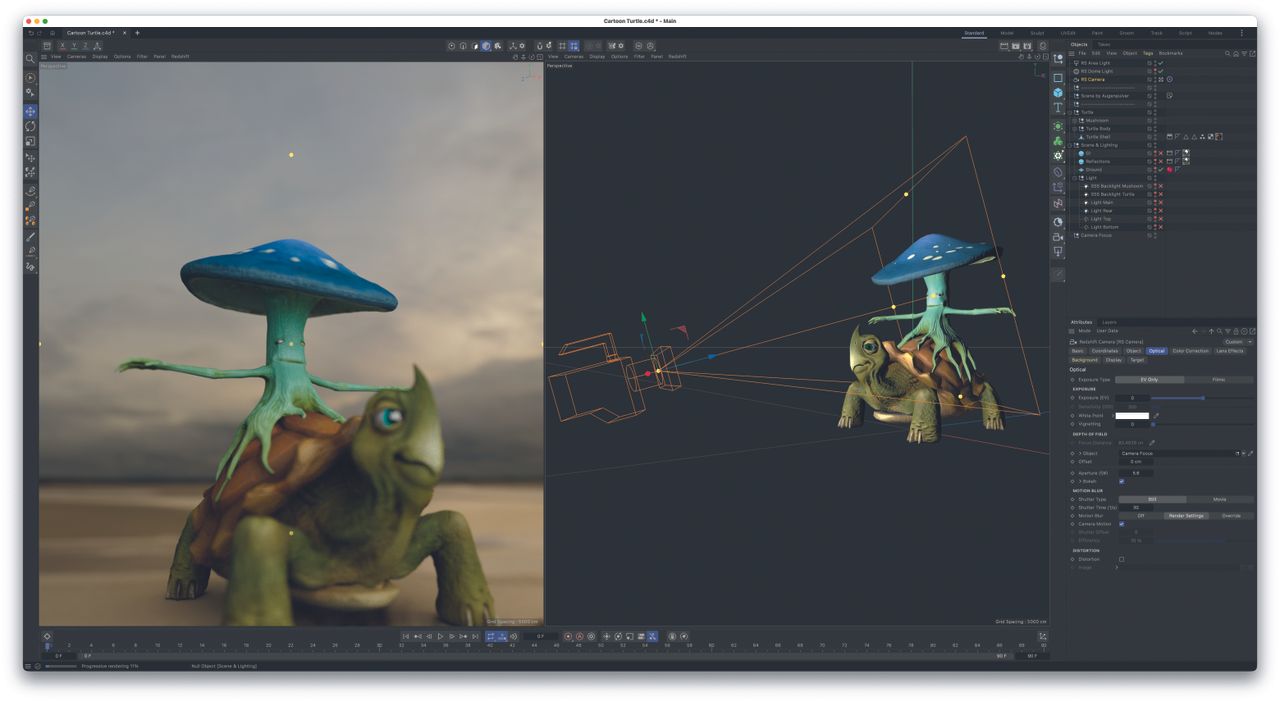
(Image credit: Future) Copy link Facebook X Whatsapp Pinterest Flipboard Email Share this article 0 Join the conversation Follow us Add us as a preferred source on Google Newsletter Subscribe to our newsletter One of the most confusing aspects when starting with 3D modelling software is that when…
(Image credit: Future) Copy link Facebook X Whatsapp Pinterest Flipboard Email Share this article 0 Join the conversation Follow us Add us as a preferred source on Google Newsletter Subscribe to our newsletter One of the most confusing aspects when starting with 3D modelling software is that when you render your first 3D scene, the output you get isn’t what you’re seeing in the 3D application’s viewport. This is because, nine times out of ten, the camera object in the 3D scene is not being used to view it, and that’s what the 3D application will typically default to when rendering.It’s useful to remember that a 3D application is essentially an empty void in which you can create whatever you wish. In this environment, you will need a camera to capture the picture or movie you want, and this is what the camera object in a 3D application is for.As so many 3D applications render using approximations of how light and materials work in the real world, it’s the same for a camera object. Camera objects work just like a real camera. The beauty of working within a 3D application is that you can just define the type of camera, lens, shutter and the exposure speed you want to use without spending thousands on expensive camera kit.If you already have a background in photography or filmmaking, this can be invaluable for creating more authentic, realistic scenes more quickly than for artists without that background. 01. The camera is an object Your 3D camera exists in the scene like any other object; most 3D applications show it as a movie camera or pyramid. It has a position and rotation and can be moved. Practically all 3D applications have a clear split between a camera view and a viewport view, and figuring out which is which is critical. 02. Frame your shot The camera object defines the render view of the 3D application, whether it is a still or an animation. It can also define the focus point using the depth of field command available in most camera objects, dependent upon the render settings used. This can be a powerful tool for storytelling. 03. Control the output Since the camera object works like a real camera, we can adjust the focal length to control how an object appears. A wide-angle lens will make an object look distorted; a telephoto lens may make it look more realistic or, when pushed to an extreme, diagrammatic. Get the Creative Bloq NewsletterSign up to Creative Bloq's daily newsletter, which brings you the latest news and inspiration from the worlds of art, design and technology. TOPICS Mike GriggsFreelance writer/digital content creatorMike Griggs is a veteran digital content creator and technical writer. For nearly 30 years, Mike has been creating digital artwork, animations and VR elements for multi-national companies and world-class museums. Mike has been a writer for 3D World Magazine and Creative Bloq for over 10 years, where he has shared his passion for demystifying the process of digital content creation. View More You must confirm your public display name before commenting Please logout and then login again, you will then be prompted to enter your display name. Logout LATEST ARTICLES 1 No beaver logo is safe from Buc-ee’s legal wrath 2 A viral $200 joke game highlights a serious problem for indie creators on Steam 3 Berlin Museum breaks the rules of branding with EIGHTY-ONE different logos 4 These are the 3 laptops you should shortlist for your studies 5 Did Coca-Cola need a redesign? Design experts weigh in on the new lookSource: Creative Bloq AI Art — Published — Category: Image AI